
Key Takeaways (3 Rules)
• Always derive lot size from your “allowed risk (%)” and the stop loss (SL) distance.
• If equity drops, you must reduce the lot size back down. Discipline first.
• For symbols like Gold whose price scale changes over time, don’t rely only on a simple balance ratio.
The Power of Auto Position Sizing
Many EAs (system trading) include an auto lot-sizing feature. It leverages compounding and can grow an account balance significantly—but swings also become larger.
Example: Backtest of Golden Alpaca Robot with auto lots.
- Period: January 2005 – August 2025
- Variable lots: ON (
UseMoneyManagement = true) - Lot sizing parameter:
mmRiskPercent = 1.5
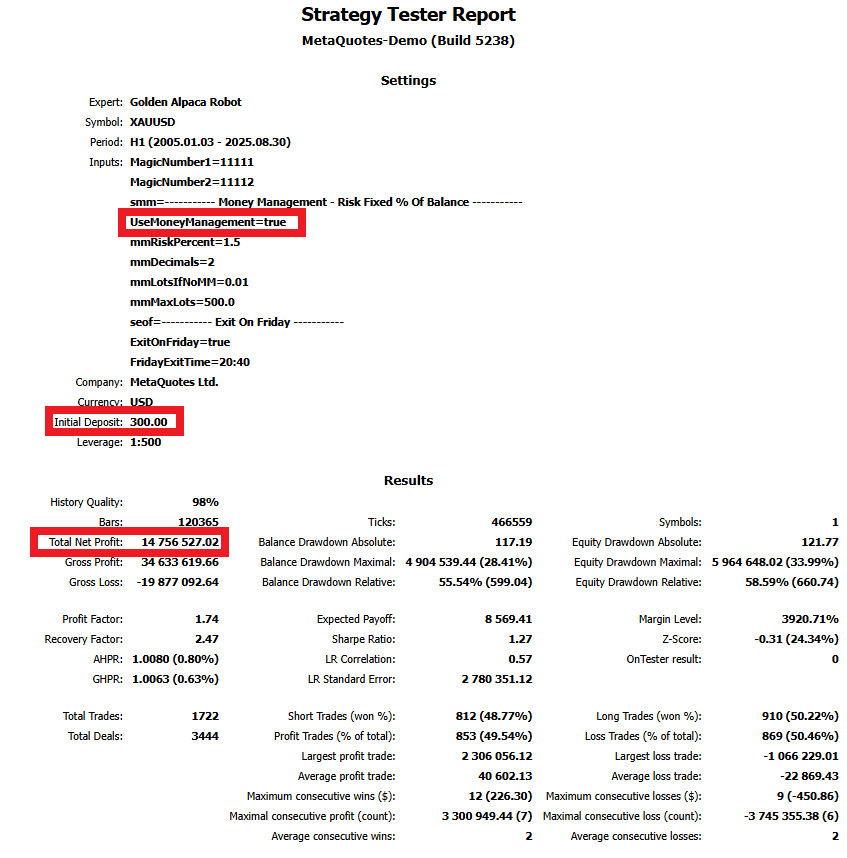
Even starting from 300 USD, the Total Net Profit reaches 14,756,527 USD over ~20 years—this shows the power of compounding and variable lot sizing. On the other hand, Equity Drawdown Relative = 58.59%, so risk increases too.
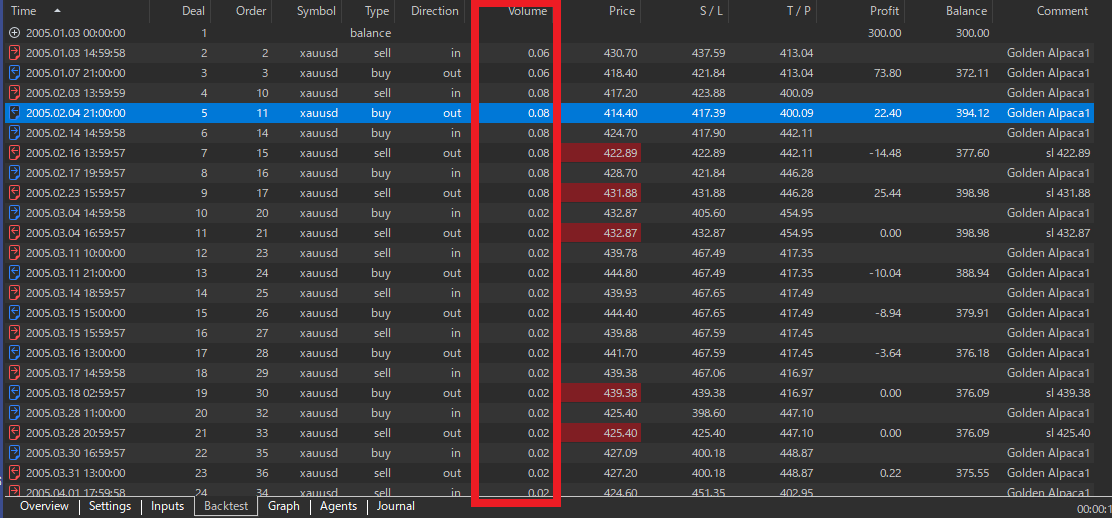
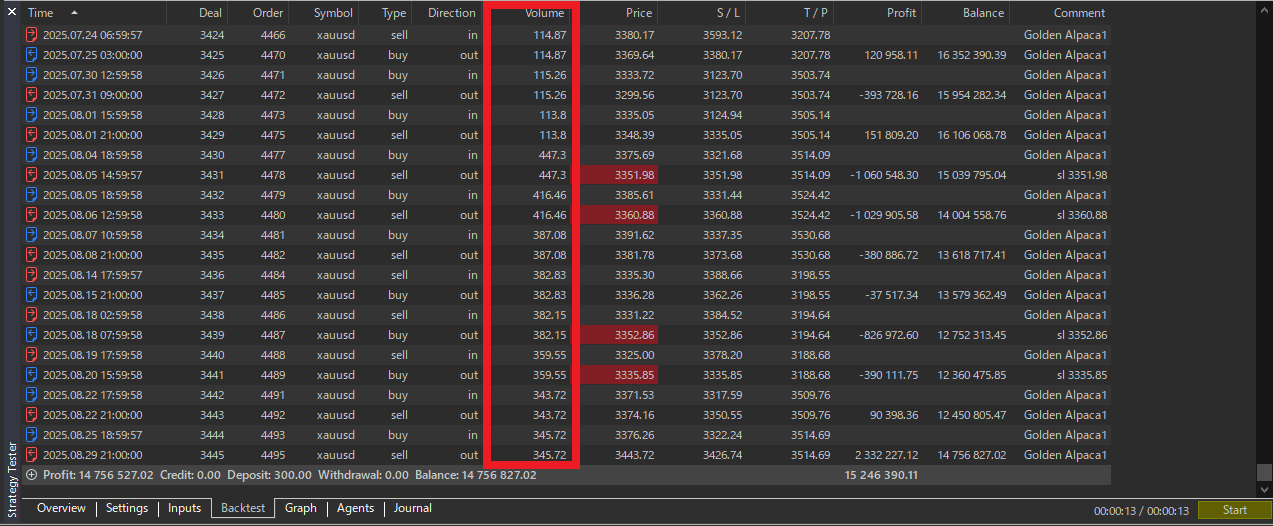
Checking the trading history, the lot size was 0.06 at the start of testing in January 2005. By the end of testing in August 2025, it had increased to 345.72 lots.
Most EAs let you set “how much risk to take.” Use backtests to find a reasonable level. In our EAs, you adjust mmRiskPercent; lowering it reduces both profits and drawdowns.
Three Ways to Decide Lot Size (incl. EA auto-sizing)
Below are three common approaches, explained simply.
① Simple Balance Ratio
Example: 0.01 lot per 100 USD of balance.
Pros: Very easy; “auto-compounding-like” growth.
Cons: Weak for symbols whose price changes a lot over years (e.g., Gold). Over ~20 years Gold’s price increased by ~10× at times, so the same 1% move leads to ~10× P&L. Risk consistency breaks (10 USD DD years ago ≈ 100 USD DD now).
② Balance × Coefficient ÷ Margin per 1 Lot
Formula: Lots ≈ (Account Balance × Coefficient) ÷ Margin Required per 1 Lot (Coefficient is an EA parameter.)
Pros: Reflects the current price level and leverage via required margin, so it’s more responsive than a simple balance ratio.
Cons:
- Ignores SL distance and volatility, so it’s not directly tied to “how much money you can actually lose.”
- Margin requirements vary by broker; they can jump on weekends or during turmoil and block new orders.
- You still need a separate policy for allowed loss %.
③ Risk-% with SL (Recommended)
Idea: Risk only r% of your balance per trade and back-solve the lot size from SL.
Pros: Keeps the loss ceiling constant across regimes (more consistent).
Cons: Requires an SL; gaps/news can cause slippage beyond the planned loss.
How (super simple):
- Balance B, risk r (e.g., 1% = 0.01) → Allowed Loss = B × r
- Estimate “loss per 1 lot if SL is hit” (depends on broker specs).
- Lots = (Allowed Loss) ÷ (Loss per 1 lot)
- Round to broker min/step/max.
For beginners, start here: Use the Risk-% with SL method by default. Our EAs primarily offer this auto-sizing model.
Notes for Symbols Whose Price Scale Changes (e.g., Gold)
For assets like Gold where the long-term price level shifts, a simple balance ratio can make the same % move translate into very different absolute P&L.
What to do:
- Prefer ③ Risk-% with SL as your standard.
- If you insist on ① or ②, add a price-scale adjustment (e.g.,
Lots × (Reference Price / Current Price)). Still, managing by SL and allowed loss % is more consistent overall.
How to Decide Deposit Amount & Starting Lot
Step 1: Estimate Max DD via backtest (fixed 0.01 lot)
Run a long backtest at the minimum lot (e.g., 0.01) and record the Max Drawdown in USD.
Example: Max DD = 100 USD (at 0.01 lot)
Step 2: Decide your “tolerable drawdown %”
Example: 50% (you can tolerate a 50% equity dip).
Step 3: Compute the starting deposit
Rule of thumb: Starting Deposit ≈ (Max DD at 0.01 lot) ÷ (Tolerable DD %)
Example: 100 ÷ 0.5 = 200 USD → Start with 200 USD at 0.01 lot.
Step 4: Manual “scale up/down” rule
- +0.01 lot per 200 USD of balance (e.g., 400 → 0.02, 600 → 0.03 …).
- Always scale down when balance drops (e.g., if you raised to 0.02 at 400 USD but fall to 300 USD, go back to 0.01).
- Humans tend to “revenge trade” by increasing size—this is dangerous. Great traders keep the discipline to scale down.
Note: With EA auto-lots, the same logic applies—Max DD estimate → Tolerable DD % → Starting deposit.
Related Articles:What is Drawdown? Understanding the Safety Zone and Tolerance Line
Mini Examples
Example 1: EURUSD (Risk-% method)
- Balance B = 1,000 USD, risk r = 1% → Allowed Loss = 10 USD
- SL = 50 pips; pip value = 10 USD/pip for 1 lot (typical)
- Loss for 1 lot if SL hit: 50 × 10 = 500 USD
- So Lots = 10 ÷ 500 = 0.02 (then round to broker min/step)
Example 2: XAUUSD (concept)
- Balance B = 1,000 USD, risk r = 1% → Allowed Loss = 10 USD
- SL = 5 USD
- Loss per 1 lot at SL depends on your broker’s contract size and tick value (let the EA compute it or check specs).
- Then Lots = Allowed Loss ÷ Loss per 1 lot, and round to step.
Operations Checklist
- Derive lots from SL and allowed loss % (recommended).
- Backtest at min lot → capture Max DD before deciding deposit.
- Recognize the price-scale problem for Gold, etc. (don’t rely solely on ①/②).
- Cut size when balance falls—no exceptions.
- Verify broker min/max/step/margin constraints.
- During news or thin liquidity, consider smaller size or pausing.
Summary
- EA auto lot-sizing is a powerful tool for growth—but manage the risk.
- Default choice for beginners: ③ Risk-% with SL.
- Decide deposit & starting lot from Max DD and tolerable DD %.
- Scaling down after losses is the key to long-term survival.